Monday, December 28, 2015

December 6th - jap chae


I first enjoyed Jap Chae at Sujeo, in Madison, last winter. It's a Korean dish also known by other similar one- and two-word names like Chap Chae, Chopchae, and Japchae. Recently, Peter Meehan posted a Jap Chae recipe on his website, Lucky Peach. Lucky Peach publishes a wide range of recipes and articles about food and the world of cooking. It is there that you may find a ranking of Trader Joe's snack foods by both taste and ability to be consumed in large portions, a recipe for Momofuku's pork buns, and an article about professional kitchen culture by Wylie Dufresne. It is also there that I feel like I really fall victim to the celebrity culture of the food world, salivating over the dishes, personalities, relationships, and lives of the people who grace the pages of Lucky Peach. I want to know them, I want to be them, and I want to cook and eat their food. They are also the ones who seem to frequent the wonderful Mind of a Chef, often in combinations with each other: Christina Tosi, Alex Stupak, Rene Redzepi, etc.


Anyway, Meehan concedes that Jap Chae doesn't sound like much on paper, but once you taste it you will understand. I had tasted and I did understand. I needed no convincing and this recipe didn't disappoint. Relying heavily on umami for its flavor (shiitakes and soy sauce), as well as sweetness (mirin, sugar, bell peppers) and saltiness (mirin and soy sauce) in balance, it hits everywhere you want it to hit. Jap chae traditionally uses the totally fascinating sweet potato noodles, which I had to track down at my local temple of all things Asian food. All the other ingredients are pretty run-of-the-mill. The sweet potato noodles are clear with a grayish tinge and remain chewy in a very nice way when properly cooked. Copious amounts of onions, red peppers, and mushrooms came together with the noodles, mirin, soy sauce, sesame oil, and sesame seeds (plenty). The dish was easy, fast, and brought the flavors of a Korean restaurant right into our home. As a bonus I got to enjoy the noodle packaging with its little "Batata" mascot.


Jap Chae
Adapted very slightly from Peter Meehan of Lucky Peach 
Ingredients

  • 10 oz cellophane or sweet potato noodles
  • 2 tablespoons cooking oil
  • 2 cups thinly sliced red onion (1 large or 2 small)
  • 3 cups thinly sliced bell pepper (2 peppers)
  • 1 cup julienned carrot (or a little more)
  • 4 cups thinly sliced shiitake mushroom caps (about 8 ounces)
  • 1 bunch scallions, thinly sliced (about 4 ounces)
  • 2 tablespoons minced garlic
  • 1/2 cup mirin (see mine above)
  • 1/3 cup soy sauce (see mine above and note I decreased the amount slightly from the original recipe, bearing in mind the salt in the mirin) 
  • 2 teaspoons sugar
  • 1 1/2 teaspoons sesame oil
  • 3 tablespoons toasted sesame seeds
  • Crushed red pepper to taste 

Directions

  • Cook the noodles: Set up a large bowl of ice water. Bring a large pot of water to a boil and cook the noodles for about 5 minutes, or according to package directions. They will be chewy. Drain the noodles, plunge them into the ice water, and drain them again. Cut the noodles in a few places to break them up.
  • Heat the oil in a large skilled over medium to medium-high heat. 
  • Add the onion and saute a few minutes.
  • Add the bell pepper and saute a few minutes. Both the onions and peppers should retain some crunch.
  • Add the carrots, then mushrooms, then scallions, then garlic, allowing the pan to heat up before each addition. 
  • Cook until the vegetables are a somewhat caramelized mass, about 10 minutes longer.
  • Deglaze the pan with the mirin, scraping up any stuck pieces. 
  • Add the vegetables to the noodles. Stir in the soy sauce, sugar, sesame oil, and sesame seeds and toss to combine. Serve slightly warm or at room temperature. 


Monday, November 30, 2015

November 28th - posole party


I have been wanting to make posole (a.k.a. pozole) since earlier this year. After enjoying it repeatedly at this fabulous establishment I became somewhat obsessed. I went so far as to pick up a couple packages of dried hominy and some New Mexico Chilies at Jungle Jim's, but when warmer weather (and the CSA, see my last post) came along I tabled the idea. Almost as soon as October was over, though, I looked at my calendar, as well as the date of the Greenacres pork harvest, and started planning.

After settling on a date (I knew it would be a project so Thanksgiving weekend seemed logical) and inviting friends I sat down and studied multiple recipes (see below). I started with the New York Times recipe as the base for mine. After a good half a day of posole-based internet research and synthesis I swung by Mazunte and picked some of the good stuff for Jonathan and me (for research purposes!).

Studying the dish in this light solidified what I already knew: posole is all about the broth. Mazunte's is a rich, thick, densely flavored broth that I just want to live in. After the broth it's all about the hominy and after the hominy I would venture to say it's all about the Mexican oregano. What it's not all about is the actual meat in the soup (pork in my case, chicken and pork in Mazunte's case).

This is my Mazunte copycat, and may not reflect other posoles, but I hope you enjoy it as much as we did! It is an all-day project (not including soaking the hominy overnight)!

Posole Rojo
Adapted from Simply Recipes, New York Times, Pati's Mexican Table, Homesick Texan, Culinate/Rick Bayless, and Food Network Kitchen (primarily)
Ingredients
Soup

  • 1-11/2 lbs dried hominy (I used 30 ounces, which I think is a little too much), soaked overnight in water (I soaked for 11 hours) 
  • 4 ounces dried red New Mexico chilies
  • 4 lbs pork shoulder, most of the fat removed and cut in 1-inch chunks
  • Kosher salt (plenty)
  • 9 cloves garlic, peeled, divided
  • 2 medium onions, chopped
  • 3 whole cloves
  • 3 bay leaves
  • 2 tsp. Mexican oregano 
Garnishes - don't skimp!
  • Lime wedges
  • Roughly chopped cilantro
  • Mexican oregano 
  • Chopped/sliced avocado
  • Thinly sliced radishes
  • Tostadas (Note: I prepared mine by coating corn tortillas in canola oil with a brush, placing them in a single layer on a baking sheet, and baking at 350 for 5 minutes, then flipping and baking for 3 more minutes. They should crisp up.)
  • Finely diced white onion, soaked in ice water (to mellow the flavor) (Optional) 
Directions

  • Drain soaked hominy and place in a large (like 3-4 gallon) stock pot with 4 cloves of garlic. Cover with about 6 quarts of water and bring to a boil. Let simmer over medium-low heat for 2-3 hours with the lid tilted, until tender. The hominy may "bloom" (burst open). (Note: I noticed that my hominy cooked unevenly, but the next steps took care of this problem. Feel free to cook yours longer if you experience this). Allow the hominy to cool in the water until you are ready to add it to the soup (this was 4-5 hours for me). It will continue to soften.
  • Pat the pork dry and season with salt. Brown in a couple tablespoons of oil in a large (like 3-4 gallon) pot over medium heat. Work in batches so as not to crowd the pork. Add 5 minced garlic cloves near the end of the last batch and cook for a minute, until fragrant. Add 5 quarts water, pork bone, 1 tbsp. salt, bay leaves, 2 tsp. oregano, onion, and cloves. Simmer, partially covered, until the meat in very tender and the broth is very flavorful, about 3 to 3 1/2 hours. Allow the meat to cool in the broth (I cooled mine for about 3 hours on the counter) and skim as much fat off the top as you can. (Note: I like to use a spoon to skim the fat into a glass, then I skim this glass into another glass and return the broth from the first glass to the pot). Remove meat from broth and remove any remaining fat from the meat. Remove bay leaves and cloves if possible.  
  • Once the hominy and the broth are going toast chilies in a cast iron skillet in batches until just fragrant. Slit lengthwise and remove and discard stems and seeds. Put in a saucepan and cover with water brought off the boil. Weight with a plate or bowl to keep them submerged and allow to soak for about 30 minutes, until hydrated. Puree in a blender with 2 cups of the soaking liquid. Strain out the tough solids and discard.
  • Combine broth, hominy, and chili puree, plus 2 tbsp. salt, and simmer for 3-4 hours or longer. Add salt (you will need a lot) and liquid (I added 2 cups hominy-soaking liquid) as needed. The broth should reduce and be very flavorful and the hominy should be tender and flavorful. If not, keep simmering.
  • Add meat shortly before serving.
  • Serve with the garnishes. Crumble the Mexican oregano between your fingers as you put it in the soup. Break up the tostadas. 
  • Invite some friends/family to share posole, or freeze some for later! 

Saturday, November 14, 2015

November 10th - squash curry soup


The realities of life after the CSA have really started to sink in this week; lingering CSA vegetables, like carrots, sweet potatoes, and squash, have hung around long enough for the transition to be gradual.

Life during the CSA was full of incredible culinary growth and palate expansion for me (and Jonathan), but included a lot of (albeit self-imposed) limitations. I bookmarked tons recipes I came across on which I couldn't justify expending cooking time and energy. I even hesitated at free meals that would mean consuming calories that weren't coming from CSA vegetables.

Thus, one of the positive aspects of life post-CSA has been a feeling of excitement stemming from the freedom to use my "kitchen energy" however I like. I have found renewed motivation from culinary possibilities, including an unhealthy obsession with pastry (though this could also be due to the approaching holidays). It's almost like a whole side of my culinary self was put on hold from June until now and that I am in the process of waking up. For example, I hadn't made traditional pizza crust since before the CSA (that changed last night), focusing instead on "alternative" pizza crusts that use CSA vegetables (see here and here).

The bad side of life post-CSA includes the obvious - greens from the grocery store really suck, our diets probably aren't as healthy and diverse, and we now have to seek out and pay for produce, which is just a pain.

The really difficult part, though, is the feeling of indecision and accompanying anxiety over the limitless choices I now apparently have in the kitchen. This, of course, stems from a lack of (albeit self-imposed) limitations. Therefore, to quell these feelings, I instituted "soup week" on Monday to limit my choices and keep myself from wavering between pizza, chickpea salad, quinoa chowder, jap chae, Indian vegetable fritters, etc., all on the same night. At the time I didn't articulate this reasoning to myself, but it became clear a few days in.

Soup week started off on Monday with Swiss chard and potato soup from the freezer, followed on Tuesday by a new recipe from Elise at Simply Recipes (below). Next came cabbage soup on Wednesday, and finally there was carrot coconut curry on Thursday

We celebrated the end of soup week by making pizza on Friday.

Squash Curry Soup
Adapted from here
Ingredients
  • 1 tbsp. unsalted butter
  • 1 1/2 cups chopped yellow onion (about 2 medium onions)
  • 2 tsp. minced garlic
  • 2 tsp. minced ginger
  • 1 1/2 tsp. curry powder (I used my favorite SWAD Madras curry powder
  • 3/4 tsp. ground cumin (preferably ground from whole seeds)
  • 1/2 tsp. ground coriander (I am wary of grinding this from whole seeds for some dishes as I can find it too pungent) 
  • Pinch of ground cinnamon
  • 1 tsp. kosher salt, plus more to taste
  • 4 cups chicken broth, vegetable broth, or water
  • 2 bay leaves
  • 3 1/2 cups (2 15 oz cans) roasted pumpkin or winter squash (You can puree this ahead of time, but I never do for dishes like this since I am going to puree everything in the end anyway. Same goes for pumpkin pie and sweet potato pancakes.)
  • 3 tbsp. heavy cream
  • 1/8 tsp. black pepper
  • 1-2 tbsp. lime juice (or lemon juice?) 
  • Sour cream or yogurt for topping
  • Toasted squash seeds for topping (optional)
  • Naan or bread for serving (optional) 
Directions
  • Melt butter in a large pot of medium heat. Add the onions and saute until they have some color, about 10 minutes.
  • Add the garlic, ginger, curry powder, cumin, coriander, cinnamon, and salt and saute for a minute.
  • Add the water/broth/stock, bay leaves, and squash. 
  • Increase heat to high, bring to a boil, then reduce to a simmer.
  • Simmer 10-15 minutes.
  • Remove bay leaves. Puree the soup using an immersion blender or blender.
  • Stir in the cream, black pepper, and lime or lemon juice to taste. Taste and adjust seasonings if needed (more salt will be necessary if you used water or salt-free broth/stock).
  • Serve with sour cream or yogurt, toasted seeds from the squash, and naan or bread. 


Saturday, October 31, 2015

CSA Week 22 - October 31st - sweet potato pancakes


Do you still have sweet potatoes? We have been LOVING them roasted (cubed and tossed with oil and salt then roasted at 400° F for about 30 minutes). This week I made a shortcut aioli to dip them in, which was delicious, but not necessary; they stand alone. But we still have a bit of a surplus right now from our own garden, including some small ones that were starting to go soft.

This morning I boiled them up and made sweet potato pancakes for Halloween morning brunch. We needed the nourishment as we put the finishing touches on our costumes; Jonathan had been crafting me a gavel out of chestnut from our yard and I had been helping him figure out where to glue the hair on his bald cap. What a great holiday.


I (with help from Josie and Jonathan) adapted this recipe for a program at work, using the seasoning blend that I use for pumpkin pie filling instead of just the nutmeg suggested in the original recipe.

This morning I subbed oat flour for the all-purpose flour. I love the added nutty flavor that oat flour gives to baked goods, but it is heavy, so if you are looking for very light and fluffy pancakes you may want to steer clear. Pancakes don't really rely on gluten to hold them together so as far as I know you are pretty safe to sub whatever flour you like. That being said, I did find these a bit more crumbly than the ones we made at work with AP flour. I made small pancakes (less than 1/4 cup batter for most) to account for this.

We topped the pancakes with homemade whipped cream and maple syrup. They were incredibly moist, bordering on gooey, in the best way possible. They tasted a lot like pumpkin pie and were more than a little addicting.

Sweet Potato Pancakes
Adapted from here and here
Serves 2-3
Ingredients
  • 3/4 cup flour (whole grain oat flour is my favorite so far, see notes above)
  • 1 tbsp. sugar
  • 1 3/4 tsp. baking powder
  • 1/2 tsp. salt
  • 3/4 tsp. cinnamon
  • 1/4 tsp. nutmeg
  • 1/4 tsp. ginger
  • 1/8 tsp. cloves
  • 3/4 cup sweet potato, boiled whole until tender, peeled, and mashed 
  • 1 egg
  • 3/4 cup milk
  • 2 tbsp. melted butter (plus extra if you like to cook the pancakes in butter like me) 
  • Whipped cream and maple syrup for serving 
Directions
  • Combine the dry ingredients in a small bowl.
  • Beat the egg in a medium bowl, then add the milk, butter, and sweet potato.
  • Mix slightly, then add the dry ingredients and mix until moist. 
  • At this point I like to use an immersion blender to puree the batter and take care of any lingering chunks of sweet potato, but you can continue to mix by hand or with a hand mixer. Maybe use a potato masher if the sweet potato chunks are giving you trouble. 
  • Heat a skillet (I like cast iron) over medium-low to medium heat. Spray with cooking spray or melt some butter in the skillet (my preference), then add ~1/4 cup (see note above) of batter to make a pancake, flattening a little if needed and repeating until the skillet is full. 
  • Cook for a few minutes, then flip and cook for a few minutes on the other side (these tend to brown pretty quickly, but they taste good browned - I think it's the sugar). 
  • Transfer to a warm oven until ready to serve. 
  • Top with whipped cream and maple syrup. Try not to eat them all. Or do, they're kind of healthy! 

Thursday, October 29, 2015

CSA Week 22 - October 26th - pasta with anchovies, garlic, chilies, and kale


This recipe comes courtesy of Melissa Clark at the New York Times. It's a simple dish that packs a flavor punch from the addition of capers and anchovies, two ingredients to which I have been somewhat of a late arrival.

Pasta with Anchovies, Garlic, Chilies, and Kale
Adapted from here
Ingredients

  • 1/3 pound pasta
  • 2 tbsp. oil 
  • Extra virgin olive oil for drizzling
  • 1/4 to 1/2 tsp. crushed red pepper
  • 4 cloves garlic, minced
  • 2 tbsp. drained capers, patter dry to encourage browning
  • 4 anchovy filets
  • 1 bunch kale (not a good measurement, I know - I didn't use the whole CSA bunch for mine)  
  • Black pepper
  • Grated Parmesan (or Clark suggests Pecorino) (optional) 
  • Squeeze of lemon (optional)
Directions
  • Bring a pot of salted water to a boil and cook the pasta to al dente. 
  • Meanwhile, heat the oil in a very large skillet. Add the red pepper and a pinch of salt and cook 1-2 minutes, "until golden."
  • Add the capers and anchovies. Let cook until the anchovies have "dissolved" into the oil, smashing them to help them along, about 3-4 minutes.
  • Add kale and a splash of water.
  • Saute until the kale is wilted, a few minutes. 
  • Remove from heat and add black pepper.
  • Serve with lemon and cheese (both optional). 

CSA Week 22


This is the final week of the CSA. The share includes sweet potatoes, onions, butternut squash, watermelon radishes, salad turnips, sweet peppers, kale, baby(ish) lettuce, tatsoi, spinach, carrots, a giant kohlrabi, parsley, and broccoli.

Sunday, October 25, 2015

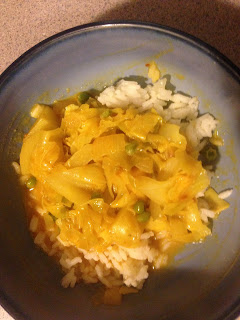
CSA Week 21 - October 24th - cabbage and sweet potato coconut curry


It wasn't a stellar week of CSA utilization, but I've been doing my best to make up for it this weekend. I've been making fajita salad, freezing peppers, experimenting with dehydrating radishes (post to come if results are positive), and making this - a warm, delicious, straightforward, coconut curry with vaguely Caribbean tendencies.


I had planned to make it with Madras curry powder, but I ended up picking up a jar of Jamaican curry powder (this one) at Jungle Jim's yesterday. I like the idea that by altering the particular curry blend (I have used Madras, Thai red curry paste, and Jamaican in various dishes) I can "push" a dish towards a certain part of the world or culinary tradition. The differences between them are going to vary by brand if you're not making your own blends and of course a lot of brands don't reveal all the spices they contain. That being said, even though the first four spices (turmeric, coriander, fenugreek, and cumin) listed on the Jamaican and Madras ingredient labels are the same, I know that the former contains allspice, whereas the latter does not. If my nose had to guess the Jamaican doesn't have Asafoetida like the Madras, either. Thai curry paste is a totally different animal. The first ingredient in mine is red chili pepper and it contains lemongrass, galangal, and kaffir lime. I also usually put a lot more of this one in a dish when seasoning it - I think the flavor is less concentrated. That being said, it would probably be equally delicious here used in the right proportions.

But let's be honest, it's really all about the coconut milk. Even without the curry coconut milk can perform magic. Coconut milk seeps into every corner of every ingredient, giving everything a luxurious flavor and mouthfeel. The spice blend just puts things over the top. Plus, the "flavor profile" of coconut curry is so adaptable (see here and here - both Thai variations).

As we were eating, Jonathan remarked that this would be good with some jerk chicken. Then we both recalled that our favorite Jamaican restaurant serves a couple of vaguely similar dishes - Mango Rundown Tofu/Salmon/Catfish/Shrimp, which has a similar flavor profile (though it's been awhile), and Mountain Boy Stir Fry, which is primarily cabbage, if I recall. Though this dish originally came from a site called, "My Columbian Recipes," I think I was on to something with the Jamaican thing.

Cabbage and Sweet Potato Coconut Curry 
Adapted from here
Ingredients

  • 3 tbsp. vegetable oil 
  • 1/2 tsp. crushed red pepper flakes, or more to taste
  • 2 small-to-medium or 1 large onion 
  • 4 cloves garlic, minced
  • 1/2 tsp ground cumin (I used pre-ground, fearing the freshly ground would be too intense for this)
  • 1 1/2 - 2 tsp. curry powder (I used this, see above)
  • 1 cup chicken or vegetable broth
  • 1 13.5-oz (or so) can coconut milk 
  • 1/2 cup tomato sauce
  • 1 tbsp. tomato paste
  • 3/4 tsp. salt, or to taste (will depend on the saltiness of the tomato sauce, too), divided 
  • 2 large sweet potatoes (I used 4 CSA sweet potatoes), peeled and cubed
  • 1 large white potato (I used 2 yukon golds), peeled and cubed
  • 1 head cabbage shredded
  • 1/2 cup shredded coconut
  • 1-2 tbsp. lime juice, or to taste, from about 1/2 lime
  • 1 cup frozen peas
Directions
  • In a stock pot, heat the oil over medium heat. 
  • Add the onion and pepper flakes and cook, stirring occasionally, until the onions soften. 
  • Add the cabbage and cook, stirring occasionally, until the cabbage collapses and maybe even takes on some color.
  • Add the sweet and white potatoes, mix, and cook a few more minutes.
  • Add the garlic, cumin, and curry, and cook about 1 minute, until fragrant.
  • Add the broth, coconut milk, and tomato sauce, tomato paste, and 1/2 tsp. salt. Bring to a boil, then reduce to medium-low.
  • Add the shredded coconut, then cover and cook about 30 minutes, until potatoes are tender. 
  • Once the curry has been simmering about 10 or 15 minutes taste and add more salt if needed, I added another 1/4 tsp. during simmering.
  • When potatoes are cooked uncover and stir in the peas and 1 tbsp. lime juice. Taste and add more salt and lime if needed. I added another 1/2 tbsp. lime.
  • Grind or sprinkle with a little extra salt when serving, if desired. 
  • Serve with rice (I used long grain cooked in the following ratio: 1 cup rice: 2 cups water: 1 tbsp. unsalted butter: 1/2 tsp. salt. You may want to increase the amount of rice by 50-100% to go with the amount of curry.)

Wednesday, October 21, 2015

CSA Week 20 - October 18th - bacon braised green beans


Our first frost set in pretty much right on schedule just ahead of week 21. That means we've continued to have a good supply of beans throughout the last weeks of the CSA.

This is a delicious and easy way to prepare them. Actually, it's my favorite way of those posted on this blog (herehere, and here). The beans turn out smoky, sweet and salty. They're not heavy or greasy as long as you drain most of the bacon fat (a change I made from the original recipe). The amounts of the ingredients are flexible (particularly the bacon), but I will offer one option below.

Bacon Braised Green Beans 
Adapted from here
Ingredients

  • 1 tbsp. cooking oil
  • 3 slices bacon, optionally diced before cooking, though I find it so much easier to dice it after cooking 
  • 1 small-to-medium red or yellow onion, thinly sliced
  • A couple pinches of sugar 
  • 1 tbsp. thinly sliced garlic
  • 1 pound green beans, trimmed
  • 1/2 cup water
  • 1/2 tsp. salt 
  • 1/4 tsp. ground black pepper

Directions

  • Set a pot over medium heat and add the oil. Once the oil is hot add the bacon and cook, turning/stirring until browned. Remove the bacon and dice it if necessary. Drain off most of the fat, but save some to cook and flavor the remaining ingredients. 
  • Add the onion and sugar and cook, stirring occasionally, until translucent. Add the bacon, garlic, and green beans and toss to combine with the onions.
  • Increase the heat to medium high and add the water. As soon was the water boils, place the lid on the pot and cook for about 6 minutes, lowering the heat if needed. 
  • Remove the lid and add the salt. Continue to cook, uncovered, stirring occasionally, until the liquid is evaporated and the beans are nicely glazed. Season with the pepper. 


CSA Week 21


This is the second-to-last week of the CSA and I am trying to mentally prepare myself for the change that is coming. I'm not sure if I will go back to doing things more-or-less the way I did before the CSA (often deciding what I wanted to eat and then getting the ingredients to make it) or if I take continue with a more ingredient-centered approach. Anyway, CSA week 21 includes onions, butternut squash, sweet red peppers, free choice jalapenos, cabbage, daikon, watermelon radishes, salad turnips, radishes, sweet potatoes, kale, tatsoi, lettuce mix, carrots, and green beans. 

Thursday, October 15, 2015

CSA Week 20 - October 14th - greens spƤtzli with sage and bacon


I picked up Jenn Louis's book, Pasta by Hand, from the library last week. It's the same book that this came from and it's full of traditional Italian recipes for pastas and the sauces that accompany them. Some are beyond what I would want to take on at this point in my culinary career, but many are quite approachable (like this one). They all sound divine. This particular dish comes from the Northern Italian region of Trentino-Alto Adige, where Germanic and Austrian culinary influences are evident, according to Louis. Hence, this is an Italian spƤtzli, but to me it is spƤtzle (or spaetzle), if only because I have a better idea of how to pronounce the latter word.


The spƤtzle is made from a dough that calls for 2 pounds (!) of spinach along with 4 eggs, 2 cups flour, and some salt and nutmeg. I used all the greens the CSA gave me this week (minus arugula and lettuce), which amounted to around 24 ounces before de-stemming. That included kale, kohlrabi greens, turnip greens, and radish greens.


To complete the dish I interpreted Louis's recipe for SpƤtzli with Sage and Speck, dressing the pasta with a basic sauce of butter, sage, bacon, salt, pepper, and Parmesan. The dumplings were tender, delicately flavored, and a perfect complement to the rich and salty sauce. In Jonathan's words, it was "restaurant-quality;" something I was excited to make, excited to eat, and excited to share. 

Spinach SpƤtzli (serves about 4) 
Adapted from here 
Ingredients
  • 2 lbs (or less, see above), fresh spinach (or whatever greens, see above), de-stemmed
  • 4 eggs
  • 1/4 nutmeg, freshly grated (I think this would be around 1/4 tsp. ground nutmeg, but I highly recommend grating whole nutmeg on a microplane)
  • 1 tsp. kosher salt
  • 2 cups all-purpose flour
Directions
  • Prepare an ice bath for the greens in a large pot or bowl.
  • Bring a large pot of salted water to a boil.
  • Add the greens and blanch for about 2 minutes.
  • Remove immediately and transfer to the ice bath.
  • When cool drain and squeeze out as much liquid as possible (by hand or in a towel). 
  • In a food processor combine the greens, eggs, nutmeg, and salt and process for about 2 minutes until the spinach is broken up and mostly chopped (I actually did this in a blender since my food processor is small).
  • Add the flour and process for about 4 minutes. The batter should be thick and smooth (I actually added the flour by hand, see above). If the batter is too thick add water 1 tsp. at a time.
  • Transfer the batter to an oiled bowl and cover with plastic wrap. Allow to rest for 30 minutes. (I didn't oil my bowl, just let it rest in a the bowl I mixed in). 
  • Line a baking sheet with parchment paper. 
  • Bring a large pot of salted water to a simmer over medium-high heat (I used the still-hot greens-cooking liquid!)
  • Process the dough through a spƤtzle/spƤtzli maker or colander into the simmering water. Simmer for about 2 minutes, stirring to release any stuck spƤtzli. Remove with a strainer or pasta spoon and transfer to the baking sheet. Let cool to room temperature. Serve right away (see below). 

SpƤtzli with Sage and Bacon (originally SpƤtzli with Sage and Speck)
Adapted from here 
Ingredients (feel free to play with the proportions, these are really estimates of what I did)
  • 6 tbsp. unsalted butter
  • 15 fresh sage leaves
  • 7 slices bacon, cooked and sliced thin
  • Salt
  • Ground pepper
  • Grated Parmesan
Directions
  • In a large saute pan, heat the butter and sage until the butter melts and browns a little. (I did this in a same pan I had used to cook the bacon after draining the fat. Yes.) 
  • Add the bacon and toss to coat.
  • Remove from the heat and add the spƤtzli.
  • Toss to combine.
  • Season with salt and pepper.
  • Top with Parmesan cheese.


Monday, October 12, 2015

CSA Week 20


CSA Week 20 includes sweet potatoes, napa cabbage, leeks, beans, arugula, salad mix, carrots, eggplant, zucchini, yellow squash, salad turnips, onions, kohlrabi, radishes, watermelon radishes, kale, red peppers, daikon radish, and butternut squash.

CSA Week 19 - October 11th - mashed kohlrabi, radish, and potato with sage


Though this photo is a bit monochromatic this dish's flavor is most certainly not. I adapted a recipe for mashed turnip and potato for mashed kohlrabi, watermelon radish, and potato. I think the technique and flavor profile (primarily sage and onions) would be adaptable for many of the root vegetables showing up in the CSA (turnips, daikons, radishes). Just watch the amount of liquid (the original recipe had too much for the vegetables I used). 

Mashed kohlrabi, radish, and potato with sage
Adapted from here.
Ingredients 

  • 2 kohlrabi, peeled and cubed
  • 1 watermelon radish, peeled and cubed
  • 1 large russet potato, peeled and cubed
  • 3 tbsp. butter
  • 1 medium onion, chopped (the original recipe calls for 2 shallots)
  • 2 tbsp. chopped fresh sage
  • 2/3 cup milk
  • Kosher salt and ground black pepper
Directions
  • Put the veggies in a pot of cold, salted water. Bring to a boil, reduce to a simmer, and cook until soft.
  • In a saucepan heat the butter over medium-high heat. Once melted and foamy, add the onions and sage and saute until the onion is tender, the sage is fragrant, and the butter begins to brown. Season with salt and pepper. 
  • Add the milk to the onion mixture and bring to a gentle simmer.
  • Drain the veggies, return to the pot, and add the milk mixture.
  • Mash with a potato masher (that's what I did) or, depending on the texture you prefer, use a hand mixer or immersion blender. 
  • Taste and add salt and pepper to taste. 

Saturday, October 10, 2015

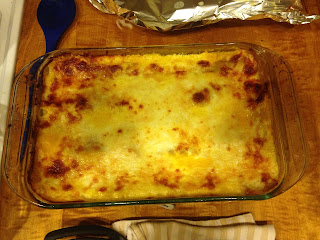
CSA Week 19 - October 9th - butternut squash lasagna


The CSA has provided us with some gorgeous (and huge!) butternut squashes in the past weeks. For a Friday dinner party I decided to christen the season by making butternut squash lasagnas, somewhat of a yearly tradition around here. I realize that I make this dish primarily as something to share with others. It does take a fair amount of work and it's somewhat of a guilty pleasure, consisting of a rich Mornay sauce, plentiful cheese, noodles, and squash puree, seasoned simply and delicately with nutmeg, salt, and pepper. It always receives rave reviews.  The squash, cheese, and nutmeg seem to epitomize warming fall comfort and make a humble, yet delicious addition or centerpiece at any cool season gathering.


The recipe comes originally from Roger Doiron, published in a 2010 issue of Mother Earth News. I don't have exact amounts for the salt, pepper, nutmeg, and cheese, but you will be able to taste the individual components before putting the dish together to determine if you are on the right track. I follow the rule that every component must taste great on its own, not relying on any other layer to carry it.


Butternut Squash Lasagna
Adapted from here
Ingredients

  • 1 tbsp. cooking oil
  • 1 (1-1/2 to 2 lb) butternut squash, peeled and cubed into 1-inch pieces (Note: Yesterday, Josie suggested baking the squash for a few minutes in a preheating oven to soften the skin and aid in this process. I tried this with butternut I was preparing for a program at work for 10 minutes in an oven preheating to 400 and I do think it helped slightly in this difficult process.)
  • Salt
  • Pepper 
  • Nutmeg, preferably freshly grated (I use a microplane)
  • 1/2 cup water
  • 1/4 cup butter
  • 1/4 cup all-purpose flour
  • 4 cups 2% or whole milk
  • 12 lasagna noodles
  • 2-1/2 cups mozzarella cheese
  • 1/3+cups Parmesan cheese (Cheese note: I have also added/subbed in Parrano with good results.

Directions

  • Heat oil in a large skillet with a lid over medium heat. Add the squash and toss to coat. Sprinkle with salt. Pour in water, cover, and simmer over medium heat until the squash is tender, about 20 minutes. Mash or puree the squash. I have used a potato masher or an immersion blender; it depends on your desired texture. Season with black pepper, nutmeg, and more salt to taste. Taste it! 
  • Melt butter in a saucepan over medium heat. Add flour and whisk one minute. You don't want the roux too fragrant for this delicate dish so don't let it take on too much color. Gradually whisk in milk. Bring to a very low boil over medium-high heat, whisking often, if not constantly. Reduce heat to medium and simmer until sauce thickens slightly, whisking often, about 5 minutes or more. Add nutmeg, salt, pepper, and Parmesan and/or Parrano cheese to taste. Taste it!
  • Preheat oven to 375 F. Lightly butter a 13x9 baking dish. Spread 3/4 cup sauce over the prepared dish. Cover the bottom of the pan with one layer of noodles. Spread half the squash over the noodles. Sprinkle with mozzarella cheese (original recipe says 1/2 cup, I say more). Drizzle 1/2 cup sauce over the cheese. Repeat layering once more, finishing with a layer of noodles covered only by white sauce.
  • Tightly cover the baking dish with foil and bake 30 minutes. Remove cover, sprinkle with remaining cheese, and continue baking until the top is golden brown, about 25 minutes. You can broil it for a couple minutes if needed to brown the cheese. Let sit 15 minutes before serving. 


Monday, October 5, 2015

CSA Week 19 - October 5th - moosewood moroccan stew


This stew, adapted slightly from New Recipes from Mooswood Restaurant, is a great summer-to-fall crossover dish, utilizing butternuts and carrots alongside tomatoes and zucchini (among others). The toppings really complete the dish, in my opinion, adding good textural contrast.


Moroccan Stew (Adapted from here
Ingredients
  • 1/4 cup oil
  • 3 cups chopped onions
  • 2 garlic cloves, minced
  • 1 tsp. cumin, preferably ground from whole
  • 1 tsp. turmeric
  • 1/2 tsp. cinnamon
  • 1/4 tsp. cayenne, or to taste
  • 1/2 tsp. paprika
  • 1 cup thinly sliced carrots
  • 4 cups cubed butternut squash (Moosewood also says you can use sweet potatoes) 
  • 3 cups cubed eggplant
  • 1 pepper, diced (I used a red pepper, Moosewood suggests green)
  • 3 cups sliced zucchini or summer squash 
  • 2 large tomatoes, chopped
  • 1 1/2 cups (1 can) cooked garbanzo beans
  • pinch of saffrom
  • 1/2 cup raisins, plus more for serving
  • 1/4 cup fresh parsley (I used 1/4 cup loosely packed dried CSA parsley)
  • 2 tsp. kosher salt
  • 2 cups water
  • Bread or pita, toasted almond sliced or pieces, and chopped hard boiled egg for serving 

Directions
  • In a stock pot, heat the oil and saute the onion for 2 to 3 minutes over medium heat. 
  • Add the garlic and spices, stirring continuously for about 30 seconds.
  • Add the vegetables in the order above, sauteing after each addition until the vegetable's color deepens. 
  • Stir in the beans, saffron, and raisins.
  • Add 2 cups water, or enough to barely cover the ingredients. 
  • Cover the stew and simmer until everything is tender, tasting and adjusting seasonings if needed. 
  • Top with more raisins, almonds, hard boiled egg, and bread or pita. 


CSA Week 19


CSA Week 19 includes onions, garlic, eggplant, daikon, watermelon radish, butternut squash, leeks, kohlrabi, beets, collards, lettuce, green beans, tatsoi, carrots, free choice green tomatoes, red peppers, and free choice jalapenos.

Monday, September 28, 2015

CSA Week 18


I find myself making a dish from week three tonight and accepting that we are truly on the other side of the season. Indeed, the Greenacres CSA only has five more weeks remaining. Week 18 includes lettuce, arugula, bok choy, kale, leeks, sweet peppers, eggplant, beets, onions, a butternut, tomatoes, green tomatoes, summer squash, zucchini, radishes, and carrots. A generous share indeed!

Monday, September 21, 2015

CSA Week 17 - September 21st - leek fritters: a friendly reminder


We have been eating leek fritters almost every week lately. If you haven't tried them you really should. They are the most consistently great fritter I have ever made. We don't always eat them with the lemon garlic cream; they are also good with plain sour cream or just plain. This dish is a prime example of something I would have never made without the CSA (even though it's in one of my favorite cookbooks).

CSA Week 17


CSA Week 16 includes leeks, radishes, carrots, lettuce, arugula, Poppen kale, tomatoes, butternut squash, onions, yellow squash, sweet peppers (lots! need ideas!), eggplant, beets, and free choice cayennes and jalapenos. 

Saturday, September 19, 2015

CSA Week 15 - September 9th - tortilla soup


Tortilla soup is a dish I have been making consistently for years, always tweaking it and adapting it to what I have available. I suppose I could consider it one of my "signature" dishes.


I typically make the soup vegetarian, but last week I added some leftover carnitas pork (I think that was the style) from Gomez salsa. That was pretty amazing.

How is this different from a chili? I don't really know. A few things that distinguish it in my mind are the crispy corn tortillas and cilantro on top as well as the corn in the soup. It's also somewhat lighter and thinner than chili and lacks the tomato base (though it does have tomatoes in it).

As with so many things it is totally customizable. I tend to go all-out with toppings (cheese, sour cream, lime, cilantro, tortilla strips, and avocado), but you certainly don't have to.

Tortilla Soup
Ingredients

  • 1 large onion, chopped
  • 1-2 bell pepper, chopped
  • Minced fresh hot pepper (e.g. 1 seeded jalapeno) to taste (or a couple pinches of dried hot pepper) 
  • 3 cloves garlic, minced
  • 1 tsp. chili powder
  • 1 tsp. ground cumin
  • 1 tsp. Mexican oregano, crushed/ground 
  • 1/4 tsp. cinnamon
  • 1/2 tsp. chipotle chili powder
  • 2 cups fresh tomato, diced (or one 14.5-oz can diced tomatoes)
  • 1 15-oz can black beans (or about 2 cups) 
  • 1.5 cups, or about 12 ounces, frozen or fresh corn (I suppose you could use canned, too, but I've never tried it)
  • Cooked pork/chicken or other Mexican-style meat (completely optional) 
  • 2-3 tbsp. minced fresh cilantro, divided
  • A few pinches of sugar
  • Salt to taste
  • 5 corn tortillas
  • Crumbled Queso Fresco and/or grated Cheddar as toppings 
  • Sour cream as topping
  • Wedges of lime for serving 

Directions

  • Saute onion with a few pinches of salt and sugar in a stock pot over medium heat until soft and somewhat caramelized. 
  • Add sweet pepper and hot pepper (if fresh) and saute until soft. 
  • Add garlic and spices and saute until fragrant, less than one minute.
  • Add 4 cups water or chicken/vegetable broth plus 1 tbsp. cilantro.
  • Add tomato, black, beans and corn. 
  • Bring to a simmer and cook, covered, about 15 minutes. 
  • Meanwhile, prepare the tortillas
    • Preheat the oven to 350 F
    • Coat the tortillas in a thin layer of oil
    • Cut tortillas into 1/2-inch-thick strips
    • Spread strips out on a baking sheet and toast 7-15 minutes (depending on the type of tortillas), checking and tossing them every 2-3 minutes. They should be slightly browned and crisp up after being out of the oven for a couple minutes. 
  • Taste and add salt if needed. (This will depend on if you use broth and on the salt in any canned veggies you use. When I use water and canned beans I believe I often add around 1 tsp. salt.) Continue simmering to allow flavors to meld. 
  • Remove from heat and ladle into bowls. 
  • Top with tortillas strips, cilantro, cheese(s), and sour cream


Thursday, September 17, 2015

CSA Week 16 - September 15th - summer squash gratin with salsa verde


I want to point you in this amazing direction before summer squash season fizzles out. That being said, I'm sure this preparation would be good with all manner of vegetables soon to be upon us (I'm thinking butternuts and sweet potatoes).


I'm not putting the recipe in the post since I didn't really make any notable modifications. I will say that I found the final dish a tad greasy (though not so much after a day) so would consider decreasing the oil in the salsa verde. 

CSA Week 15 - September 10th - grilled eggplant with fresh hot sauce and crispy eggs


This dish was in the August issue of Bon Appetit Magazine. It was a novel and winning flavor combination for us. I love that it specifically calls for Japanese eggplant and sings its praises. I have been having similar sentiments, finding it creamier, tastier, and easier to work with than Italian-type varieties.

Jonathan grilled the eggplant while I put together the hot sauce and other toppings.

Grilled Eggplant with Fresh Hot Sauce and Crispy Eggs
Adapted from here.

Ingredients 
Hot Sauce (You will likely not use all the hot sauce for this scaling of the recipe especially if you use Cayennes, as I note)
2 Fresno chilies, with seeds, chopped (I used 2 seeded CSA Cayennes, but it was HOT and I couldn't use nearly all the hot sauce. Still good, though)
1 garlic clove, minced
Kosher salt
2 tbsp. red wine vinegar
1 tbsp. honey

The rest of the dish
2 Japanese eggplant, halved lengthwise
~3 tbsp. oil, divided
Freshly ground black pepper
3 scallions (white and light green parts only), thinly sliced (or to taste)
~1/3 cup cilantro, coarsely chopped (or to taste)
~1 tbsp. fresh dill, chopped (or to taste)
2 large eggs

Directions

  • Prepare grill for medium heat.
  • Toss chilies garlic, and a large pinch of salt in a small bowl. Let sit until just softened, 8-10 minutes. Stir vinegar and honey into hot sauce
  • Meanwhile, coat eggplant with oil and season with salt and pepper. Grill, turning occasionally, until lightly charred and tender, 6-8 minutes. Cut on the bias into thick slices; toss in a large bowl with scallions, half the cilantro and dill, and and about one fourth of the hot sauce. Transfer to plates.
  • Heat remaining oil over medium high heat. Add eggs and season with salt. Cook until whites are golden and crisp around the edges and set around the still runny yolk, about 2 minutes. Flip and cook until yolks just begin to set, about 30 seconds. Season with black pepper. Optionally, cut the eggs (I didn't since the yolk was still runny and I didn't want to lose any!), then arrange over eggplant. 
  • Top with remaining herbs and another fourth of the hot sauce, or to taste. 


CSA Week 16


Week 16 includes lettuce, bok choy, beans, leeks, beets, carrots, tomatoes, onions, green onions, eggplant, red peppers, and free choice cayennes and jalapenos. There were also sunflowers, but I forgot to pick them up.

Thursday, September 10, 2015

CSA Week 15


CSA Week 15 is Swiss chard, bok choi, carrots, onions, sweet peppers, eggplant, yellow squash, zucchini, a cucumber, scallions, leeks, beets, green beans, tomatoes (what you see is what we got - no more free choice), free choice jalapenos, and free choice cayennes.

CSA Week 14 - September 7th - panzanella


MAKE THIS BEFORE IT'S TOO LATE. Okay that's my general sentiment about all summer foods right now, but this panzanella (my first) is seriously good.


Be sure to store bread leftovers separate from the rest of the salad so the bread doesn't get soggy.


Panzanella
Adapted from here

Ingredients 
Salad
  • 1 tbsp. olive oil and 1 tbsp. cooking oil
  • 1 small loaf of bread, cut into approx. 1/2-in cubes
  • 1-2 tsp. minced garlic
  • A few pinches kosher salt 
  • 2 large, ripe tomatoes, cut into 1-in cubes
  • 1 cucumber, peeled and sliced
  • 1 bell pepper (or more if you like), cut into 1/2-in cubes
  • 1/4 red onion, thinly sliced
  • ~20 leaves basil, coarsely chopped
  • 2 tbsp. capers, drained
Vinaigrette
  • 1 tsp. minced garlic
  • 1/2 tsp. Dijon mustard
  • 2 tbsp. white wine vinegar
  • 1/3 cup olive oil
  • 1/2 tsp. kosher salt
  • 1/4 tsp. ground black pepper
Directions
  • Whisk or shake the vinaigrette ingredients together. 
  • Heat the oil in a large saute pan. Add 1-2 tsp. garlic, then the bread, and cook over low to medium heat, tossing frequently, for 10 minutes or until nicely browned.
  • In a large bowl, mix the tomatoes, cucumber, bell pepper, onion, basil, and capers. Toss with the vinaigrette. Season with salt and pepper if needed. 
  • Allow to sit and meld for about 1/2 hour. 
  • Mix in bread cubes with each serving that will be eaten immediately. Make sure they soak up some of the delicious liquid (which we drank out of the bowls when we ran out of bread). 

Monday, September 7, 2015

CSA Week 14 - September 7th - carrot ginger soup


This soup is among my oldest recipes. The original version comes from Bruce via Rudi and is very adaptable and forgiving. If you can get through peeling and chopping 4 onions the soup is an absolute breeze.


And yes, I am in the midst of a bit of a pureed soup obsession (see here, here, and here), any supposed seasonality about eating soup be damned, because the ingredients are in season! And I want soup! At least a decent amount has been making it into the freezer.

Carrot Ginger Soup
Adapted from Bruce

Ingredients
1 tbsp. butter plus 1 tbsp. cooking oil
4 medium onions, chopped
4 cups veggie or chicken stock (this yields a very thick soup so add more if you want it thinner)
3 lbs. carrots, peeled and chopped
1-2 tbsp. grated fresh ginger (this version had 1, which I liked)
1/3-1/2 cup heavy cream (will someone try subbing coconut milk and get back to me, though?)
Salt
Ground black pepper
Nutritional yeast as a topping (optional)

Directions

  • Saute onion in oil and butter until soft
  • Add ginger and saute until fragrant, less than one minute
  • Add carrot and saute a couple minutes
  • Add stock and simmer until carrot is tender.
  • Remove from heat and add ground black pepper to taste and cream
  • Puree, then taste and add salt to taste
  • Optionally, top with nutritional yeast, which adds richness/fullness 


Tuesday, September 1, 2015

CSA Week 14 - August 31st - shakshuka


A recipe for shakshuka recently came across my NY Times Cooking Newsletter and piqued my interest. 


It's is mixture of onions, peppers, and tomatoes seasoned with cumin and cooked down, then topped with eggs and baked. This version (and Melissa Clark's) includes feta. I highly recommend it!

Shakshuka
Adapted from here and here

Ingredients

  • 1 tbsp. cooking oil
  • 1 medium red onion (or other type of onion), chopped
  • 3 cloves garlic, minced
  • 1 medium red bell pepper, chopped (I used two small CSA 'Lipstick' peppers)
  • 4 cups diced tomatoes
  • 2 tbsp. tomato paste
  • 1 tsp. cumin, preferably ground from whole seeds
  • 1 tsp. paprika
  • Minced cayenne pepper or a few pinches of ground cayenne pepper to taste (Optional. We actually ate it with schug so I omitted the hot pepper completely. I would probably add some if I wasn't using schug.)
  • A few pinches of sugar
  • A few big pinches of salt
  • Ground black pepper
  • 5 eggs
  • About 6 ounces feta cheese (I used a soft Bulgarian sheep feta, which was delicious. It didn't stay intact, but melted into the dish once incorporated, so if you want pockets of feta like Melissa Clark indicates, use a drier feta.)
  • Bread, pasta, and/or summer squash for serving [I loved it with roasted summer squash (summer squash, garlic, oil, salt, pepper, Parmesan], Jonathan preferred it without).
  • Cilantro and/or parsley for serving if desired. As I noted above, we ate it with schug so I omitted the fresh herbal topping.

Directions 

  • Preheat oven to 375 F
  • Heat the oil in a large skillet over medium
  • Add the onion and saute until it begins to soften
  • Add the sweet pepper and saute until softened, a few more minutes
  • Add the garlic and saute until fragrant
  • Add the tomatoes and tomato paste and stir to blend
  • Add the spices, salt, and sugar, and allow to simmer until reduced/thickened
  • Taste and adjust seasonings, but remember that you're adding feta!
  • Remove from heat and mix in feta
  • Top with ground black pepper 
  • Crack the eggs, one at a time, directly over the tomato mixture, making sure to space them evenly over the sauce.
  • Transfer to the oven and cook, uncovered, until the eggs are cooked to your liking, 10 minutes for runny yolks and 12-13 minutes for cooked yolks. 
  • Garnish with cilantro, parsley, and/or schug (Jonathan liked the schug with this more than I did). Update 9/19/15 - this was delicious with leftover salsa verde from this in place of any other herbal toppings or schug. 
  • Serve with roasted squash, bread, and/or pasta. 

CSA Week 13 - August 27th - Swiss chard and potato soup


Just see here if you have chard sitting in the fridge. I recently posted about this at work (we made it during Farm-to-Table camp this summer) and I made it for Jonathan and me last week. Feel free to adjust the amount of chard. Proportionally, I used about half the amount indicated in the recipe in my last batch.


CSA Week 13 - August 27th - roasted eggplant and tomatoes with Parmesan


Given that I am pretty behind on blog posts and I have lot to share here...eventually...hopefully...I needed to prioritize what I thought would be most useful to any potential recipe/idea seekers out there for this post. I didn't even think to post about this dish before I made it, as is apparent from the afterthought of a photo, but after making it last week, it shot to the top of the list. I know a number of people struggle with what to do with eggplant; this the easiest and most delicious preparation I have found.

I have been making this dish for years. Roasting eggplant and tomatoes together with plenty of garlic and topping with Parmesan makes even tomatoes on their way to the compost burst with flavor and eggplant melt-in-your-mouth creamy. And they complement each other so well.

Roasted Eggplant and Tomatoes with Parmesan Cheese 
Adapted from here.
Note: This is less of a recipe and more of a set of guidelines to play with.

Ingredients

  • 2 Oriental eggplant, cut into thick half moons, some peel removed if desired (I like to take two strips off of each fruit)
  • A handful of cherry tomatoes or 1-2 slicing tomatoes, cut into thick slices
  • 2-4 cloves garlic, minced
  • Salt
  • Cooking oil
  • Parmesan cheese, shredded
Directions
  • Preheat oven to 425 F
  • Toss the eggplant, tomato, and garlic with salt to taste and enough oil to coat
  • Spread the mixture out in a baking dish or on a baking sheet and roast, tossing every 10-15 minutes, until eggplant is creamy, 20 to 40 minutes 
  • Top with Parmesan cheese

Note: I don't find it necessary to salt this Oriental eggplant to remove bitterness, but it may be necessary for some varieties.